
Taxes
Every business in Canada is required to collect and remit taxes such as GST, HST, PST, QST, or RST, depending on the province in which it operates. In Zoho Books, you can configure tax rates, tax groups, exemptions, and agencies to meet the tax requirements of your business and apply them automatically to your transactions.
Enable Tax
If your business is registered to collect and remit taxes, you can enable taxes in your Zoho Books organisation. To enable tax:
- Go to Settings.
- Navigate to Organization Settings.
- Select Taxes under Taxes & Compliance.
- Click Enable Tax to enable taxes for your organisation.
- Click Save.
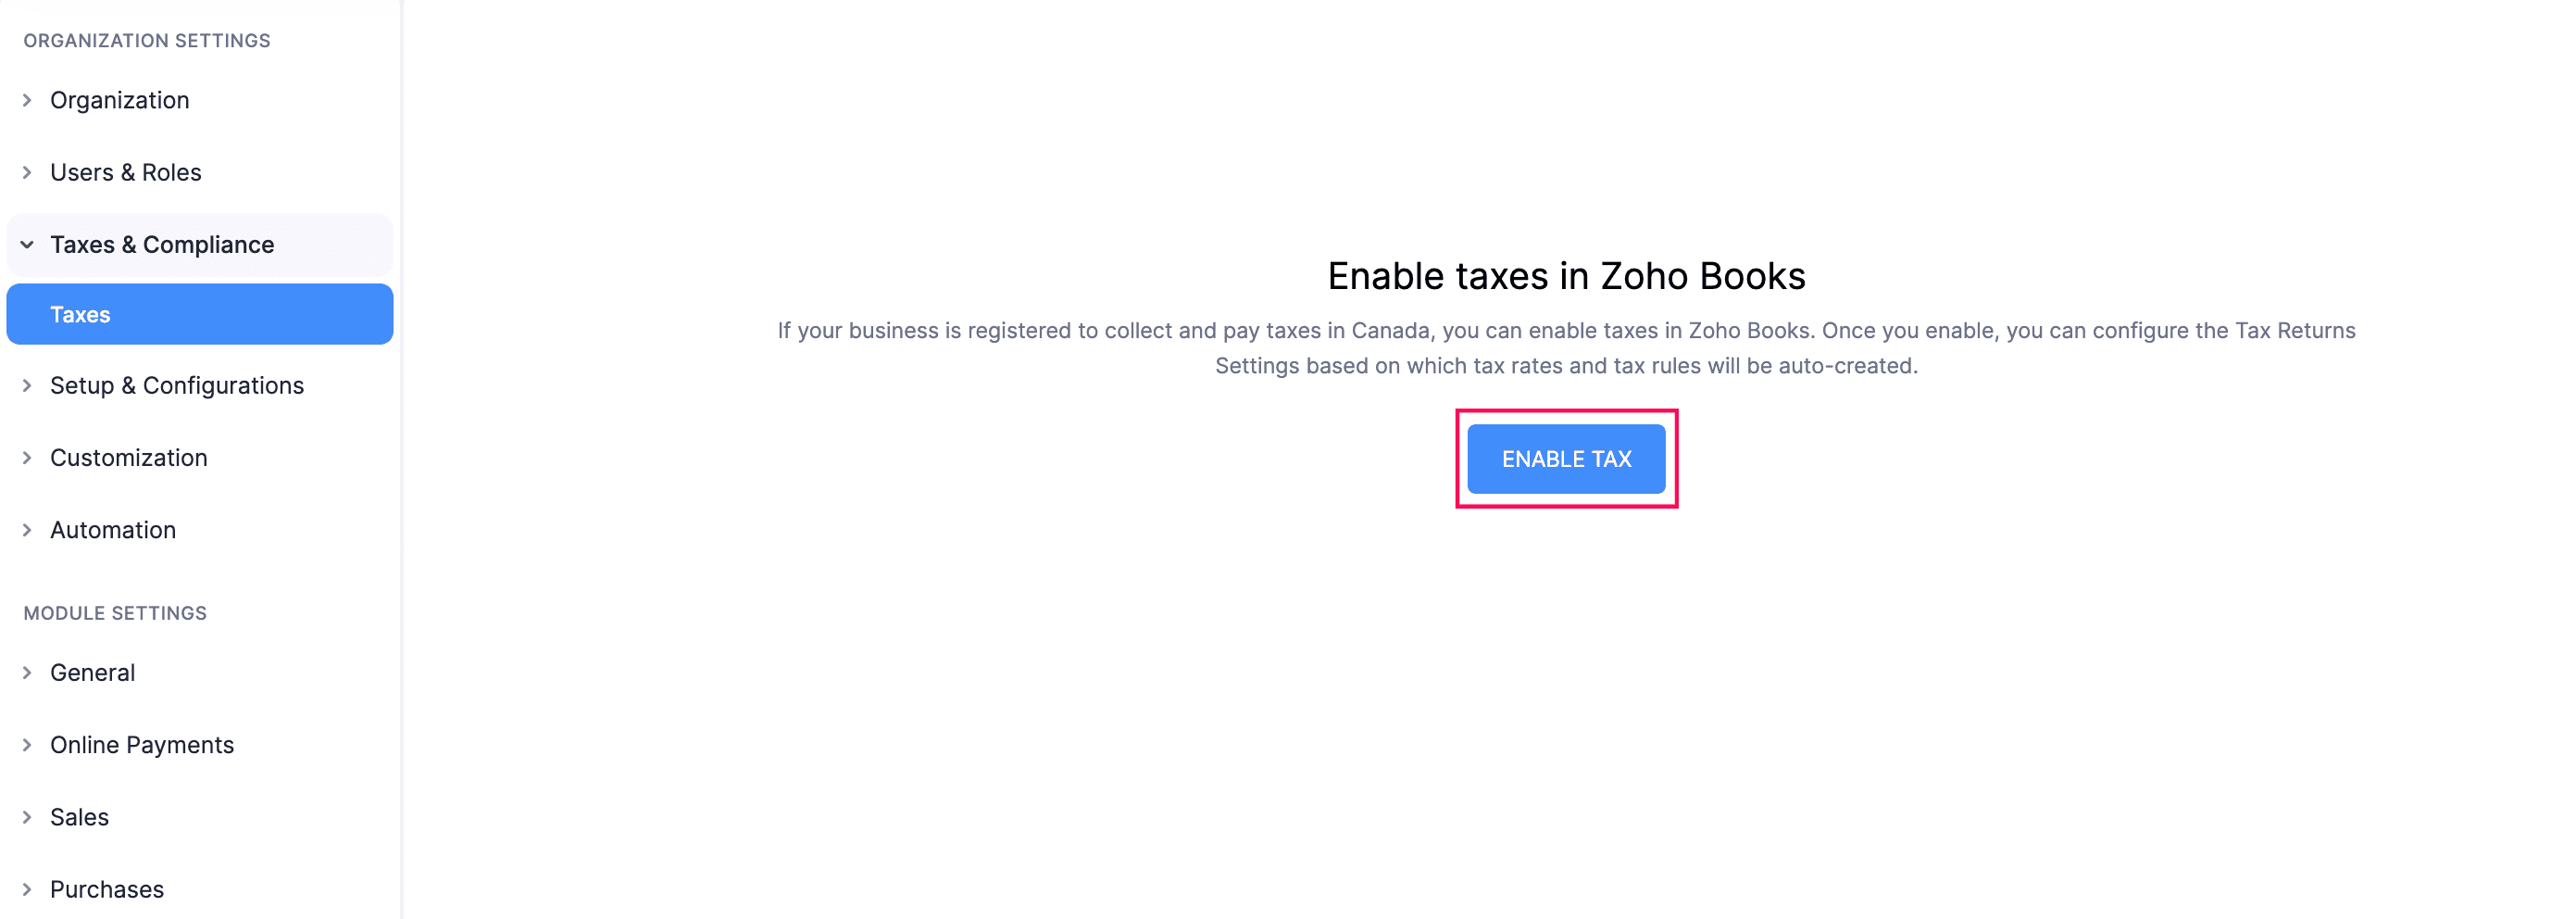
Taxes will now be enabled for your organisation.
Set Up Tax Registration
Tax registration allows you to set up the taxes applicable to your business based on your location and legal requirements. This ensures that taxes are calculated correctly in your transactions and helps you stay compliant with regulations.
To set up tax registration in your Zoho Books organisation:
- Go to Settings.
- Navigate to Organization Settings.
- Select Taxes under Taxes & Compliance.
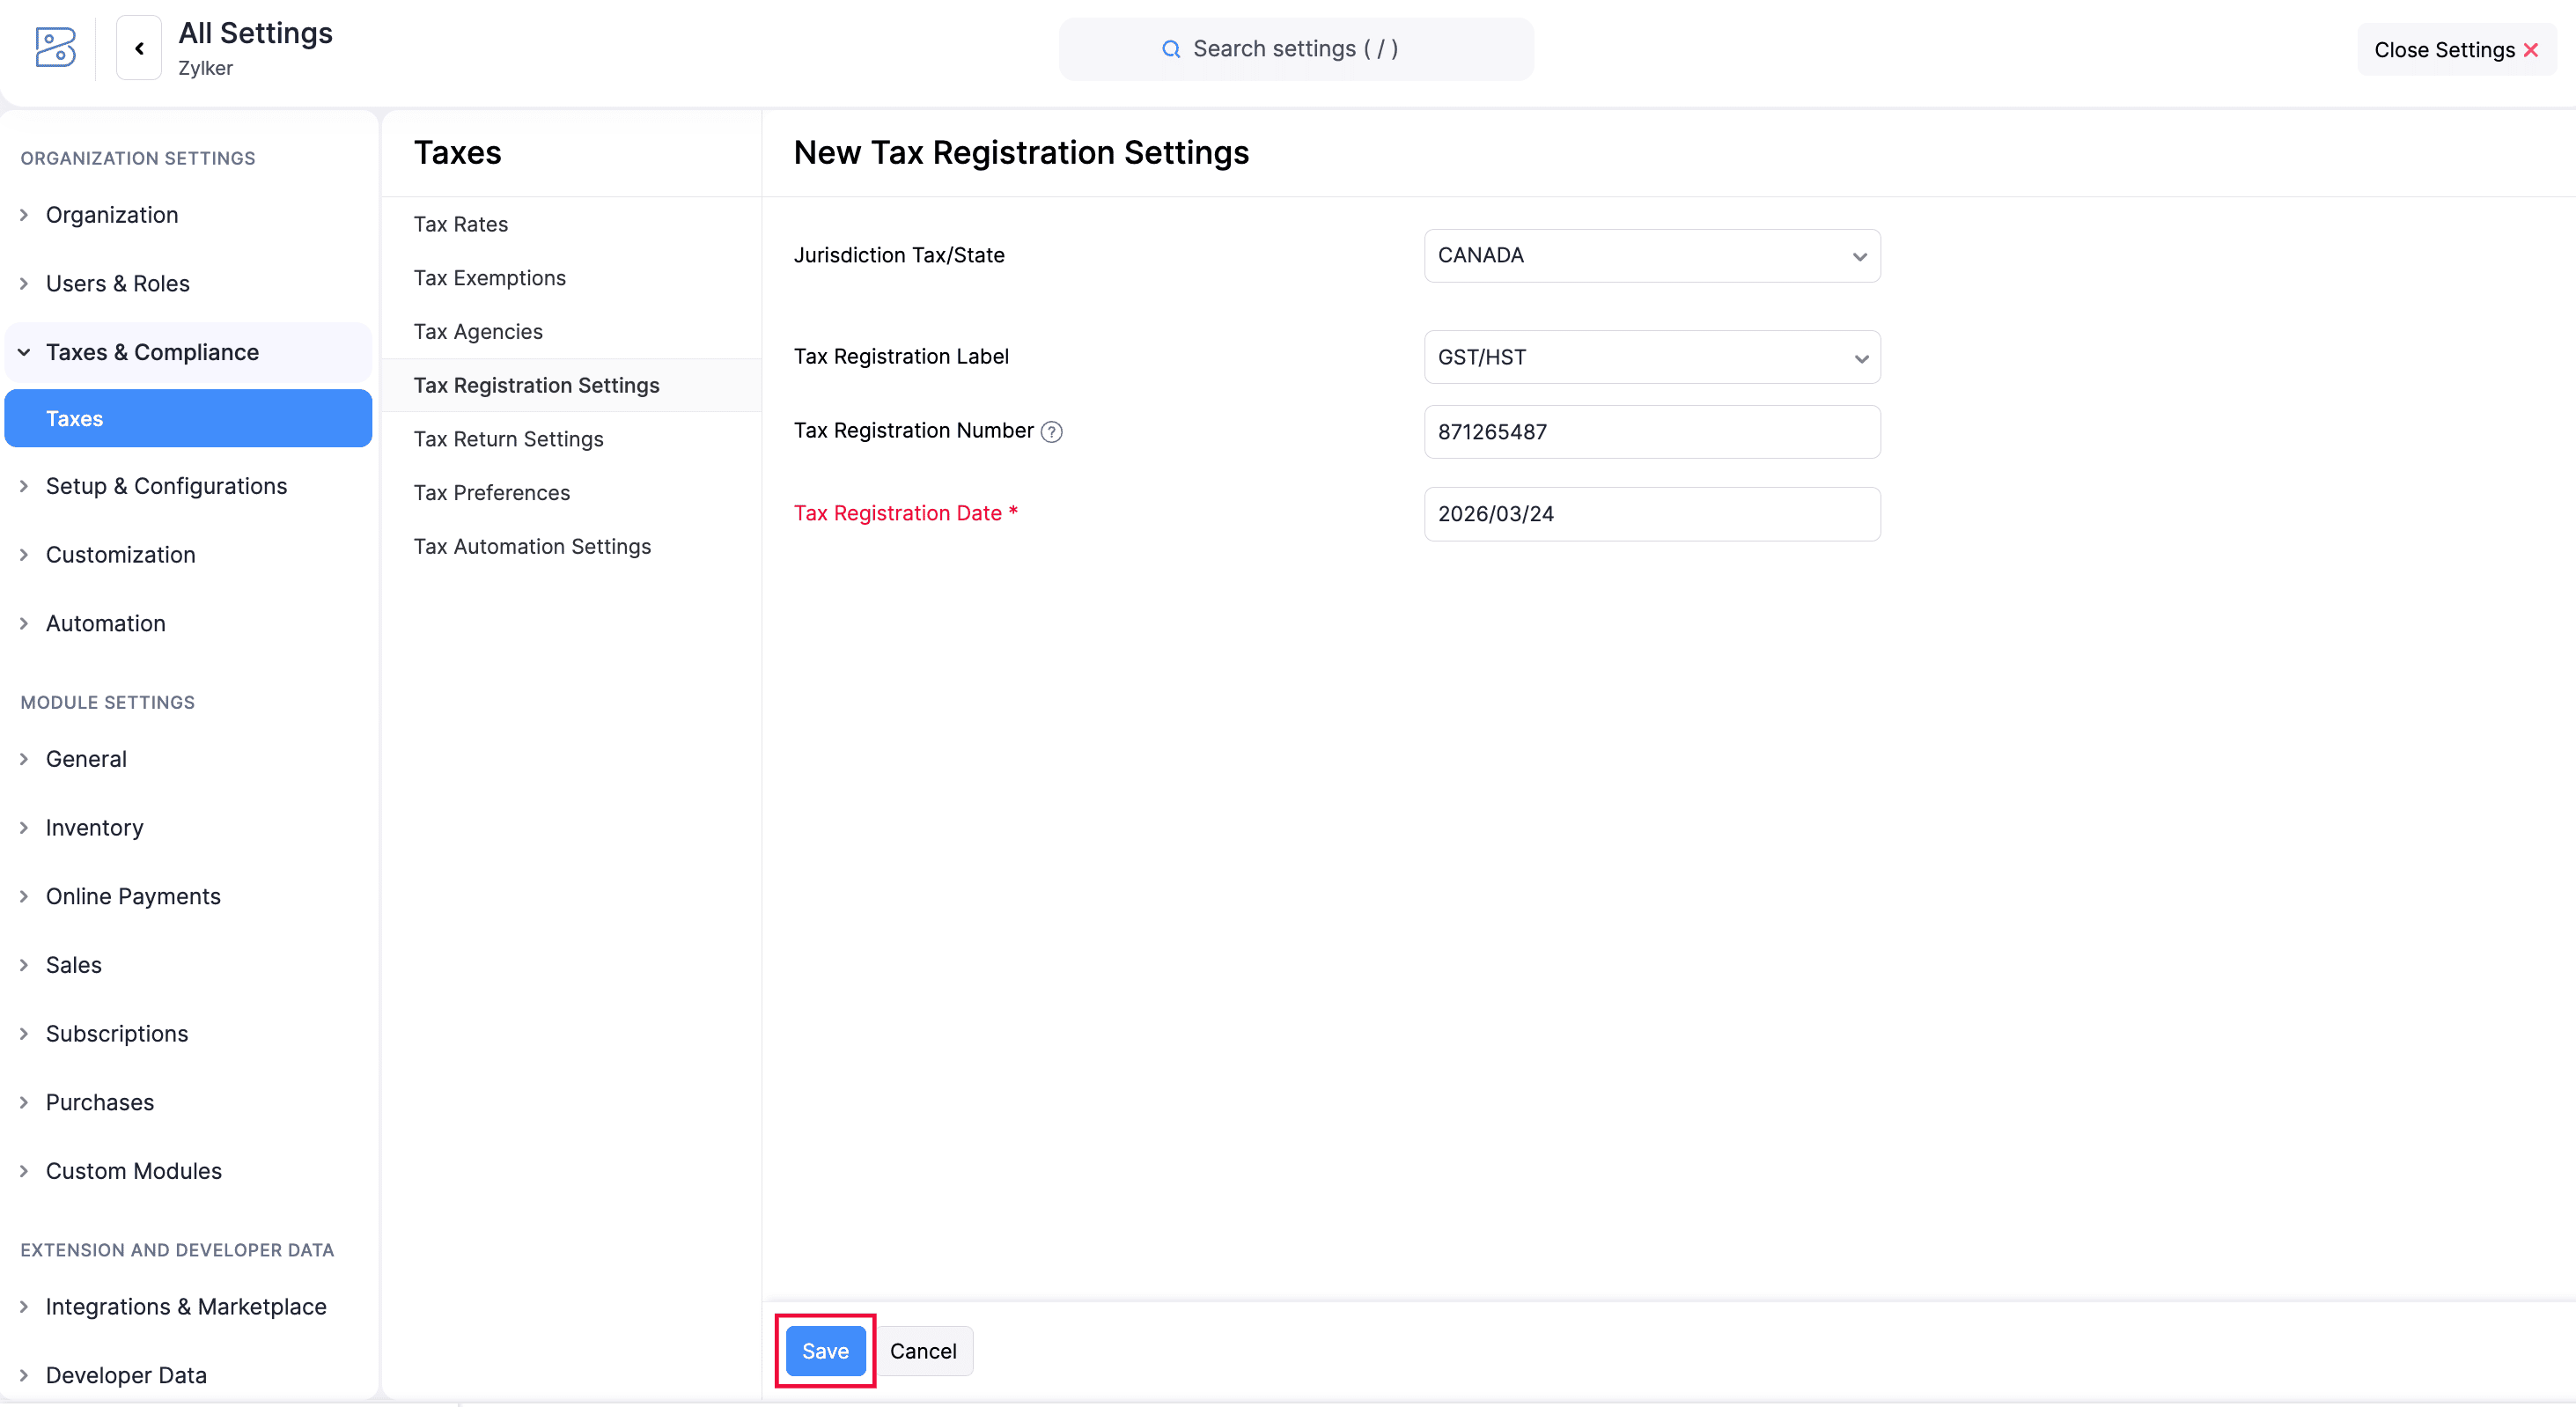
- Navigate to Tax Registration Settings and click + New Tax Registration.
- In the New Tax Registration Settings page, enter the required details to set up your tax registration:
- Select the Jurisdiction Tax/State for which you are registering for tax.
- The Tax Registration Label will be auto-selected.
- Enter the Tax Registration Number.
- Select the Tax Registration Date.
- Click Save.
Configure Tax Returns
A tax return is a report that businesses or individuals submit to a tax agency to declare the taxes they have collected, paid, or owe for a specific tax period.
In Zoho Books, you can configure tax returns based on the provinces where your business is registered to collect and remit taxes. Once configured, you can generate the relevant tax return reports for a selected period and mark them as filed after submitting them to the respective tax agency.
You can configure the following tax returns in your Zoho Books organisation:
- Goods and Services Tax (GST) / Harmonized Sales Tax (HST) Return
- British Columbia Provincial Sales Tax (BC PST) Return
- Quebec Sales Tax (QST) Return
- Manitoba Retail Sales Tax (MB RST) Return
- Saskatchewan Provincial Sales Tax (SK PST) Return
To configure tax returns:
- Go to Settings.
- Navigate to Organization Settings.
- Select Taxes under Taxes & Compliance.
- Navigate to Tax Return Settings.
- Click + New Tax Return Settings.
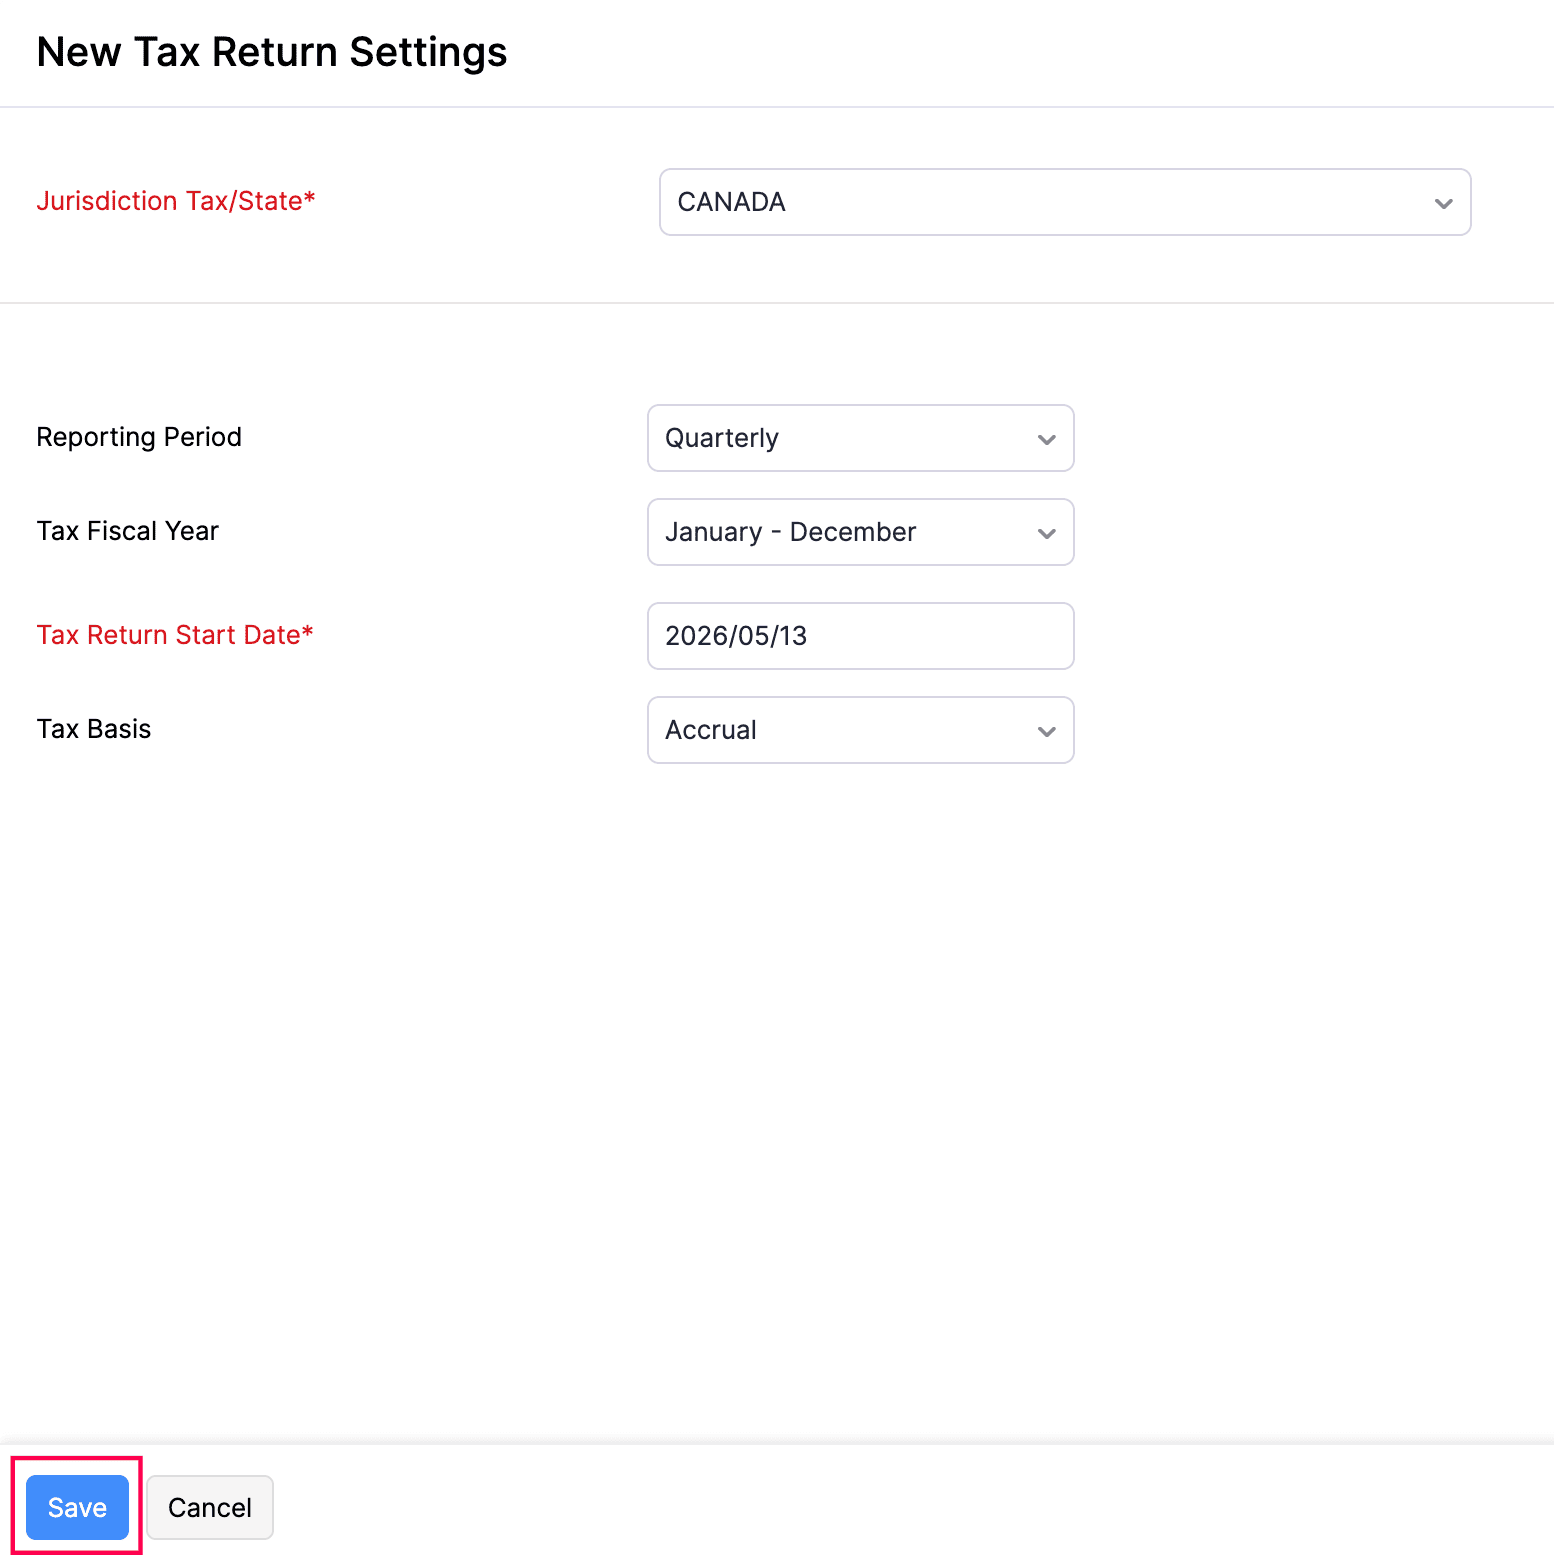
- In the New Tax Return Settings page, enter the following details:
- Select the Jurisdiction Tax/State for which you want to configure tax returns. Only the tax registrations that have been set up in your organisation will be available for selection.
- Click the Reporting Period dropdown and select whether you want to generate the return Monthly, Quarterly, or Yearly.
- Select the date from which you want to generate the return in the Tax Return Start Date field.
- Click the Tax Basis dropdown and select whether you want to generate the return on an Accrual or Cash basis.
- Click Save.
Tax Rates
In Zoho Books, you can add a new tax rate, edit an existing one, mark a rate as inactive, or delete a rate that is no longer needed.
Add a New Tax Rate
To add a new tax rate:
- Go to Settings.
- Navigate to Organization Settings.
- Select Taxes under Taxes & Compliance.
- Navigate to Tax Rates.
- Click + New Tax in the top-right corner.
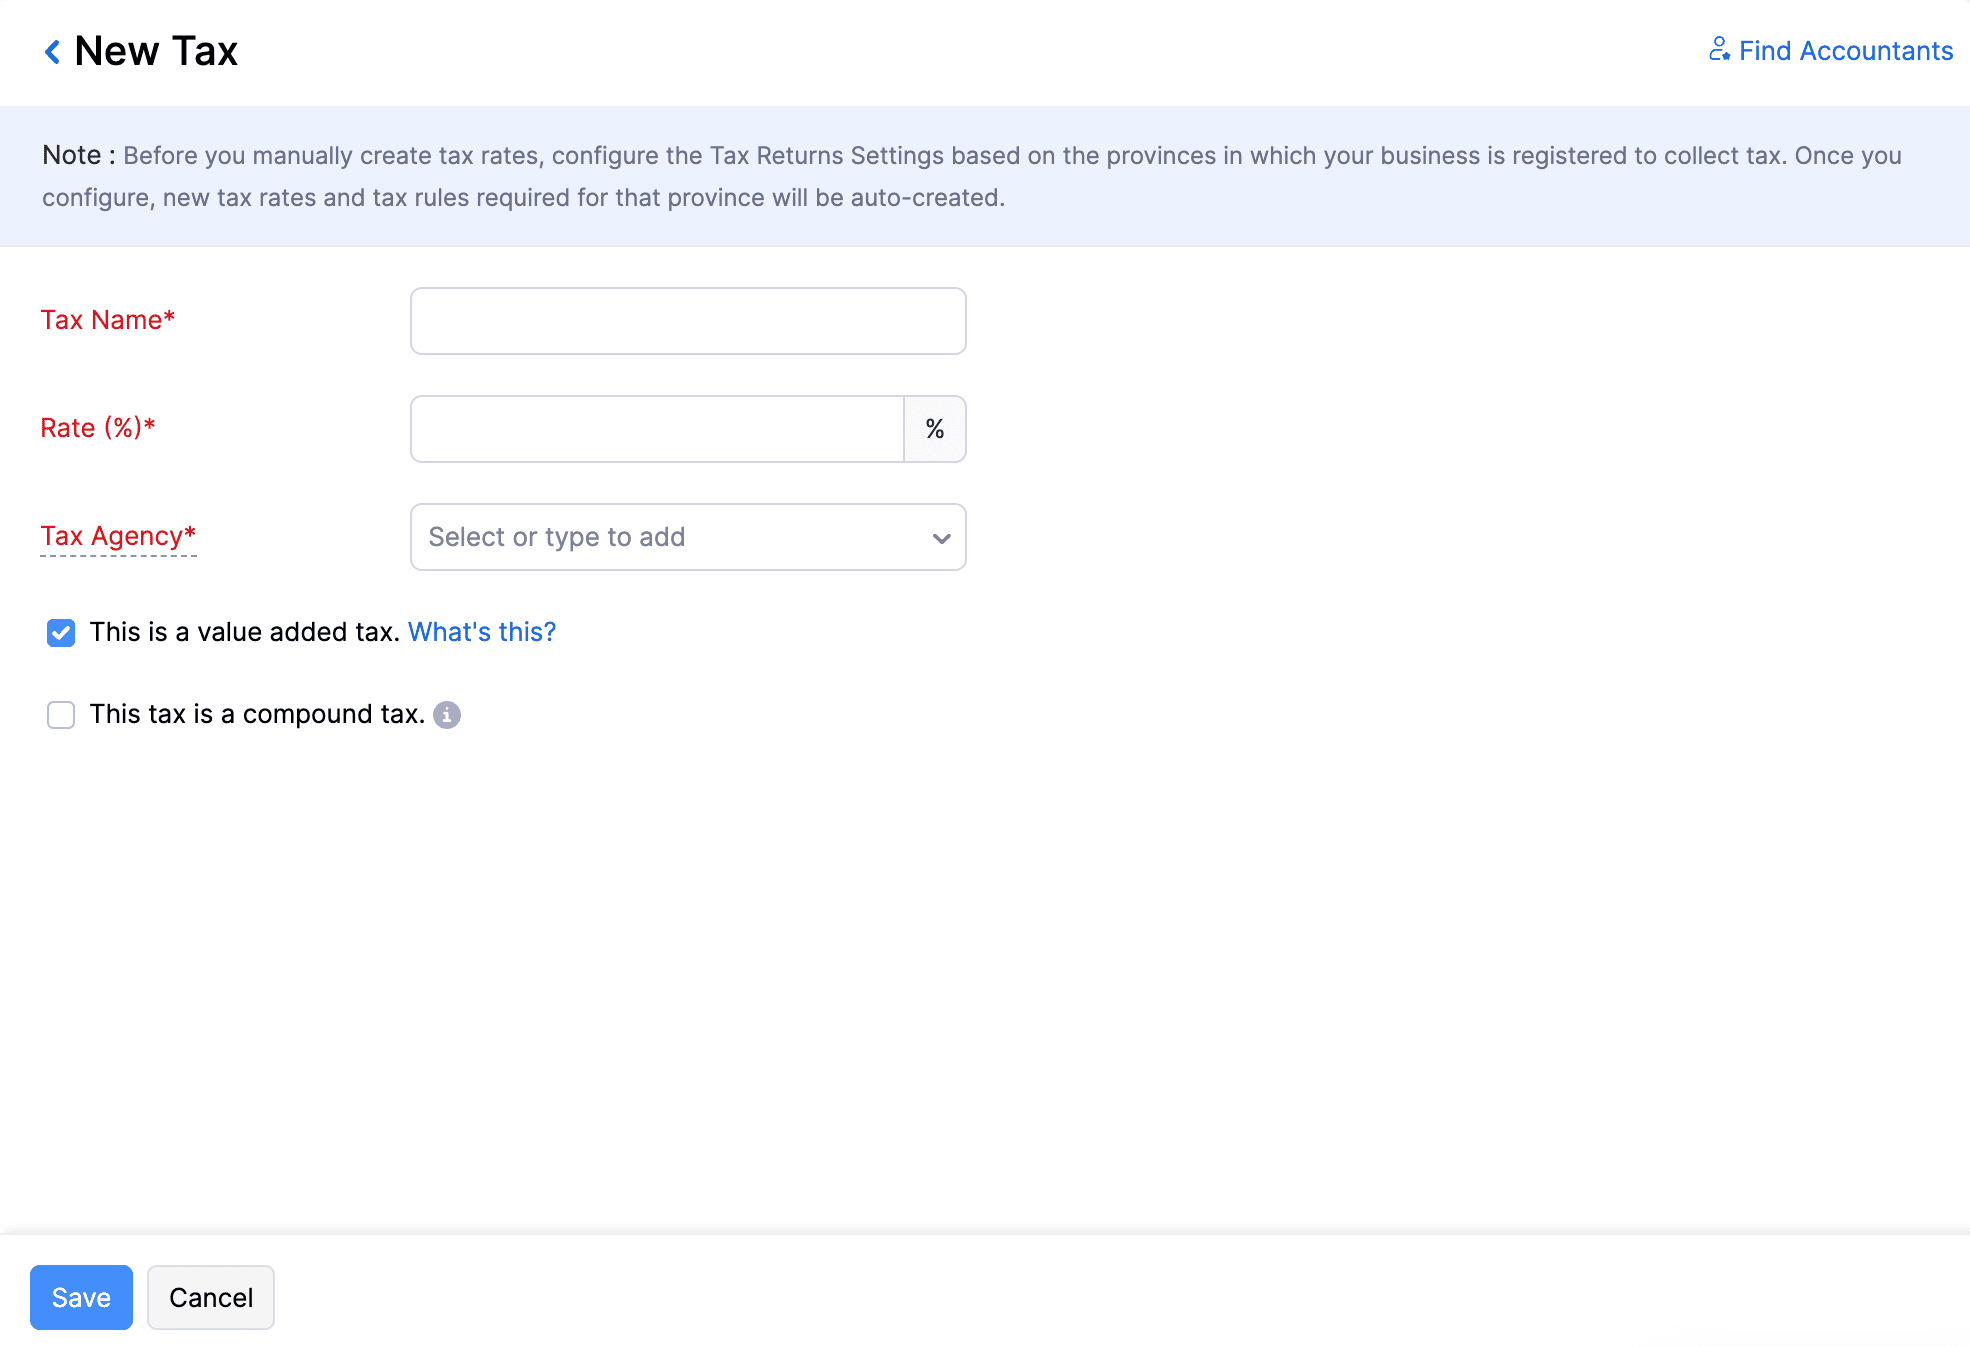
- In the New Tax page, fill in the following fields:
- Tax Name: Enter a name for the tax.
- Rate (%): Enter the percentage at which the tax must be applied.
- Tax Agency: Select the tax agency to which this tax will be remitted, or type a new name to create one.
- This is a value added tax: Check this option if the tax can be reclaimed from the tax authority.
- This tax is a compound tax: Check this option if the tax should be calculated on top of another tax (the item or invoice amount plus another tax, such as GST).
- Click Save.
The new tax rate will now be added and listed under Active taxes.
Edit a Tax Rate
To edit an existing tax rate:
- Go to Settings.
- Navigate to Organization Settings.
- Select Taxes under Taxes & Compliance.
- Navigate to Tax Rates.
- Click the More icon next to the tax rate that you want to edit, then select Edit from the dropdown.
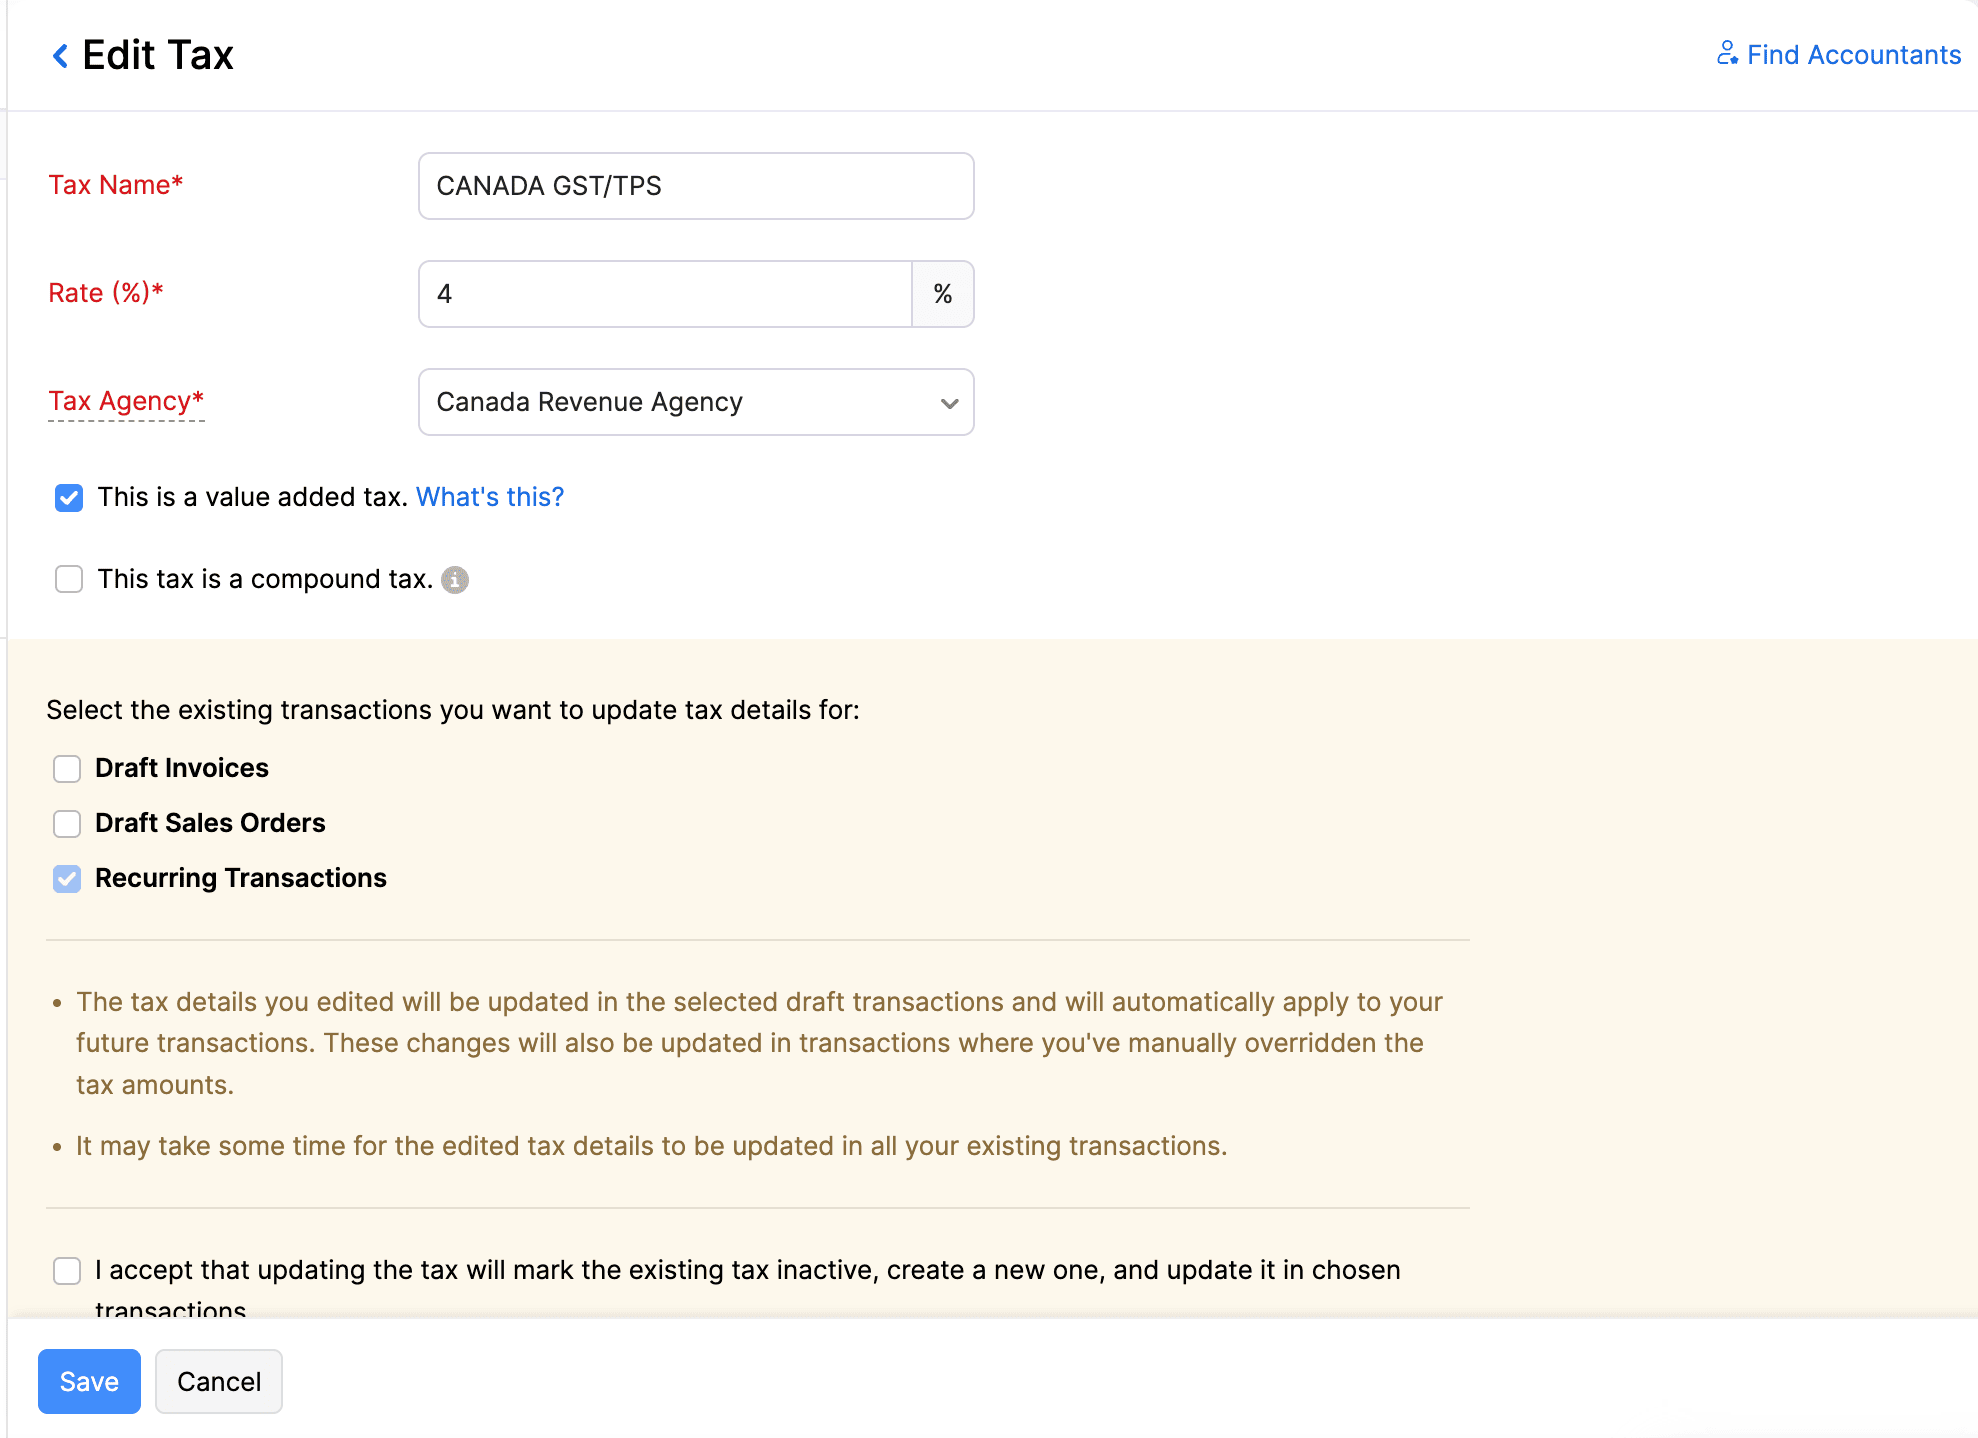
- In the Edit Tax pane, make the necessary changes.
- If the tax has already been applied to existing transactions, you’ll be prompted to confirm whether the updated rate should be applied to those transactions as well. Select the existing transactions you want to update.
- Check the I accept that updating the tax will mark the existing tax inactive, create a new one, and update it in chosen transactions option.
- Click Save.
The tax rate will be updated.
View Associated Records of a Tax Rate
To view the associated records of a tax rate:
- Go to Settings.
- Navigate to Organization Settings.
- Select Taxes under Taxes & Compliance.
- Navigate to Tax Rates.
- Click the More icon next to the tax rate whose associated records you want to view, then select View Associated Records from the dropdown.
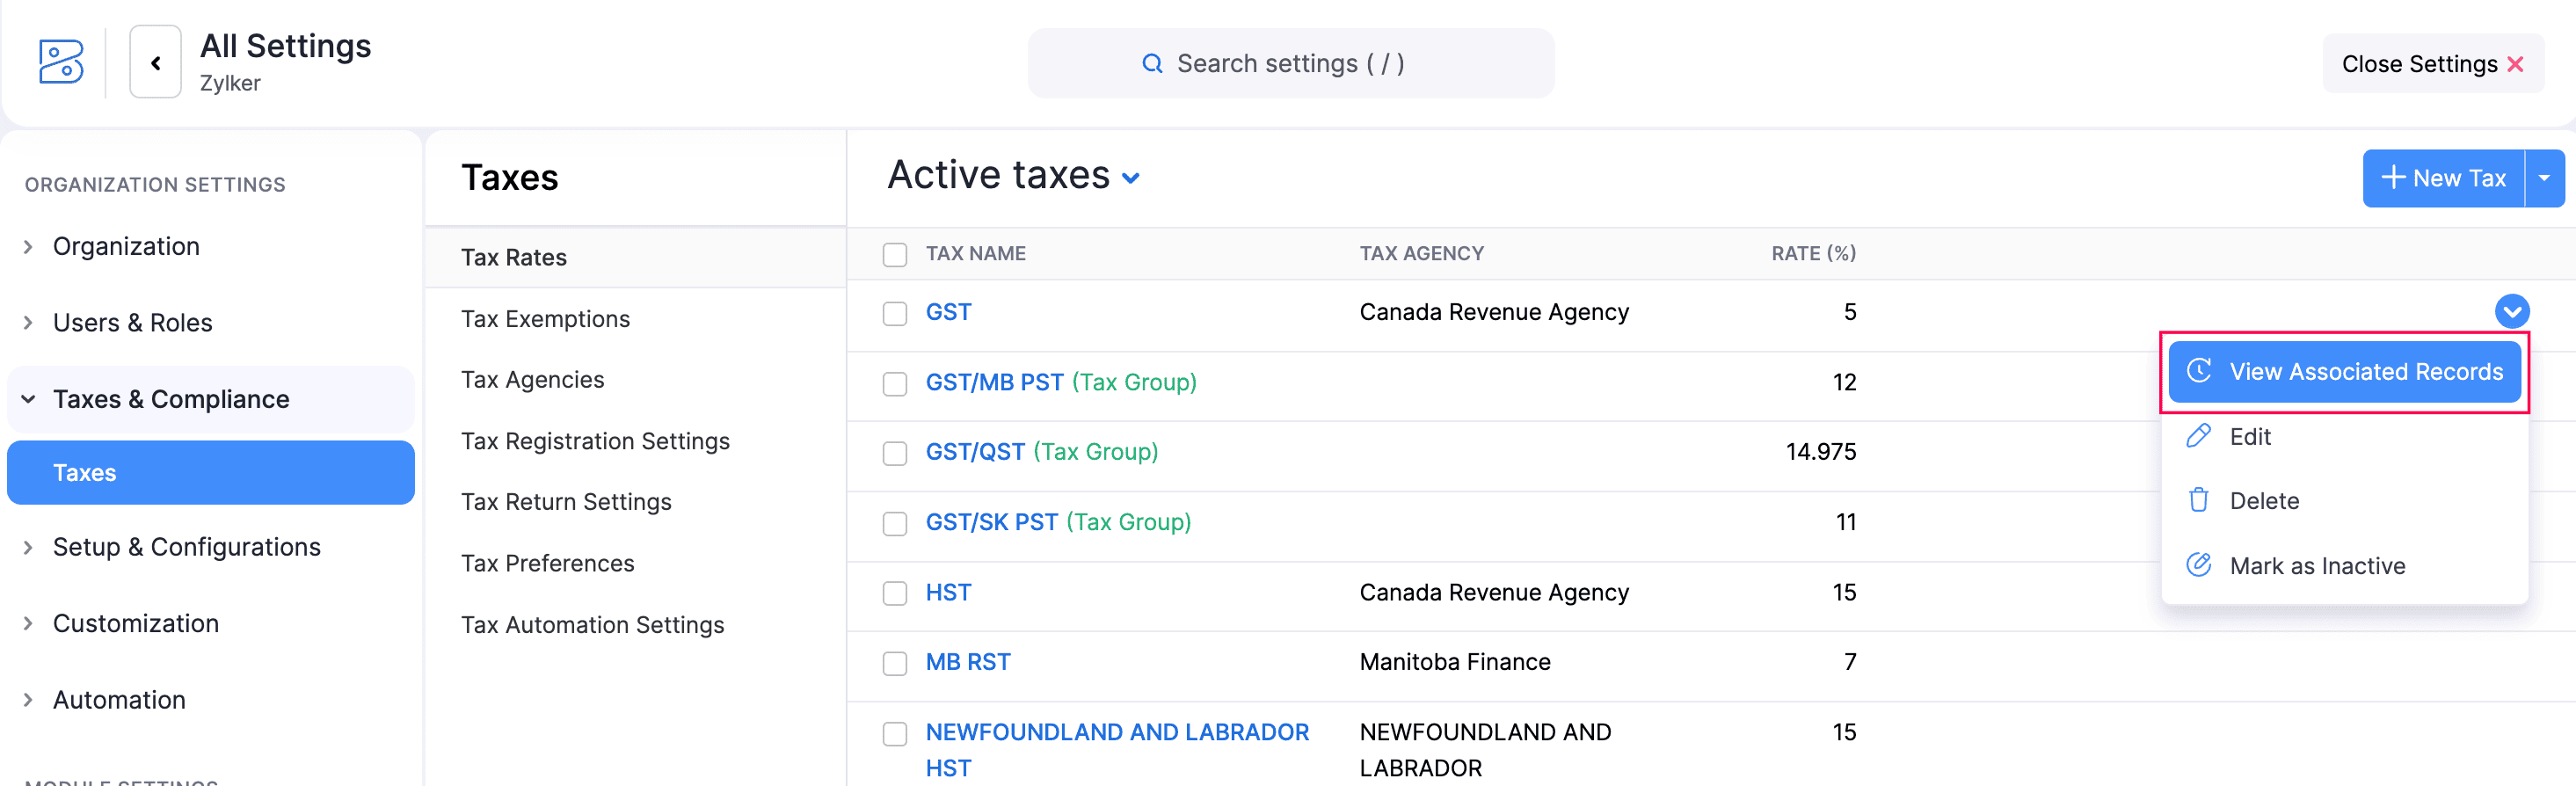
In the Associated Records panel on the right, you can view all records associated with the tax rate.
Mark a Tax Rate as Inactive
To mark a tax rate as inactive:
- Go to Settings.
- Navigate to Organization Settings.
- Select Taxes under Taxes & Compliance.
- Navigate to Tax Rates.
- Click the More icon next to the tax rate that you want to mark as inactive, then select Mark as Inactive from the dropdown.

- In the confirmation pop-up, click OK.
The tax rate will be marked as inactive.
Delete a Tax Rate
To delete a tax rate:
- Go to Settings.
- Navigate to Organization Settings.
- Select Taxes under Taxes & Compliance.
- Navigate to Tax Rates.
- Click the More icon next to the tax rate that you want to delete, then select Delete from the dropdown menu.
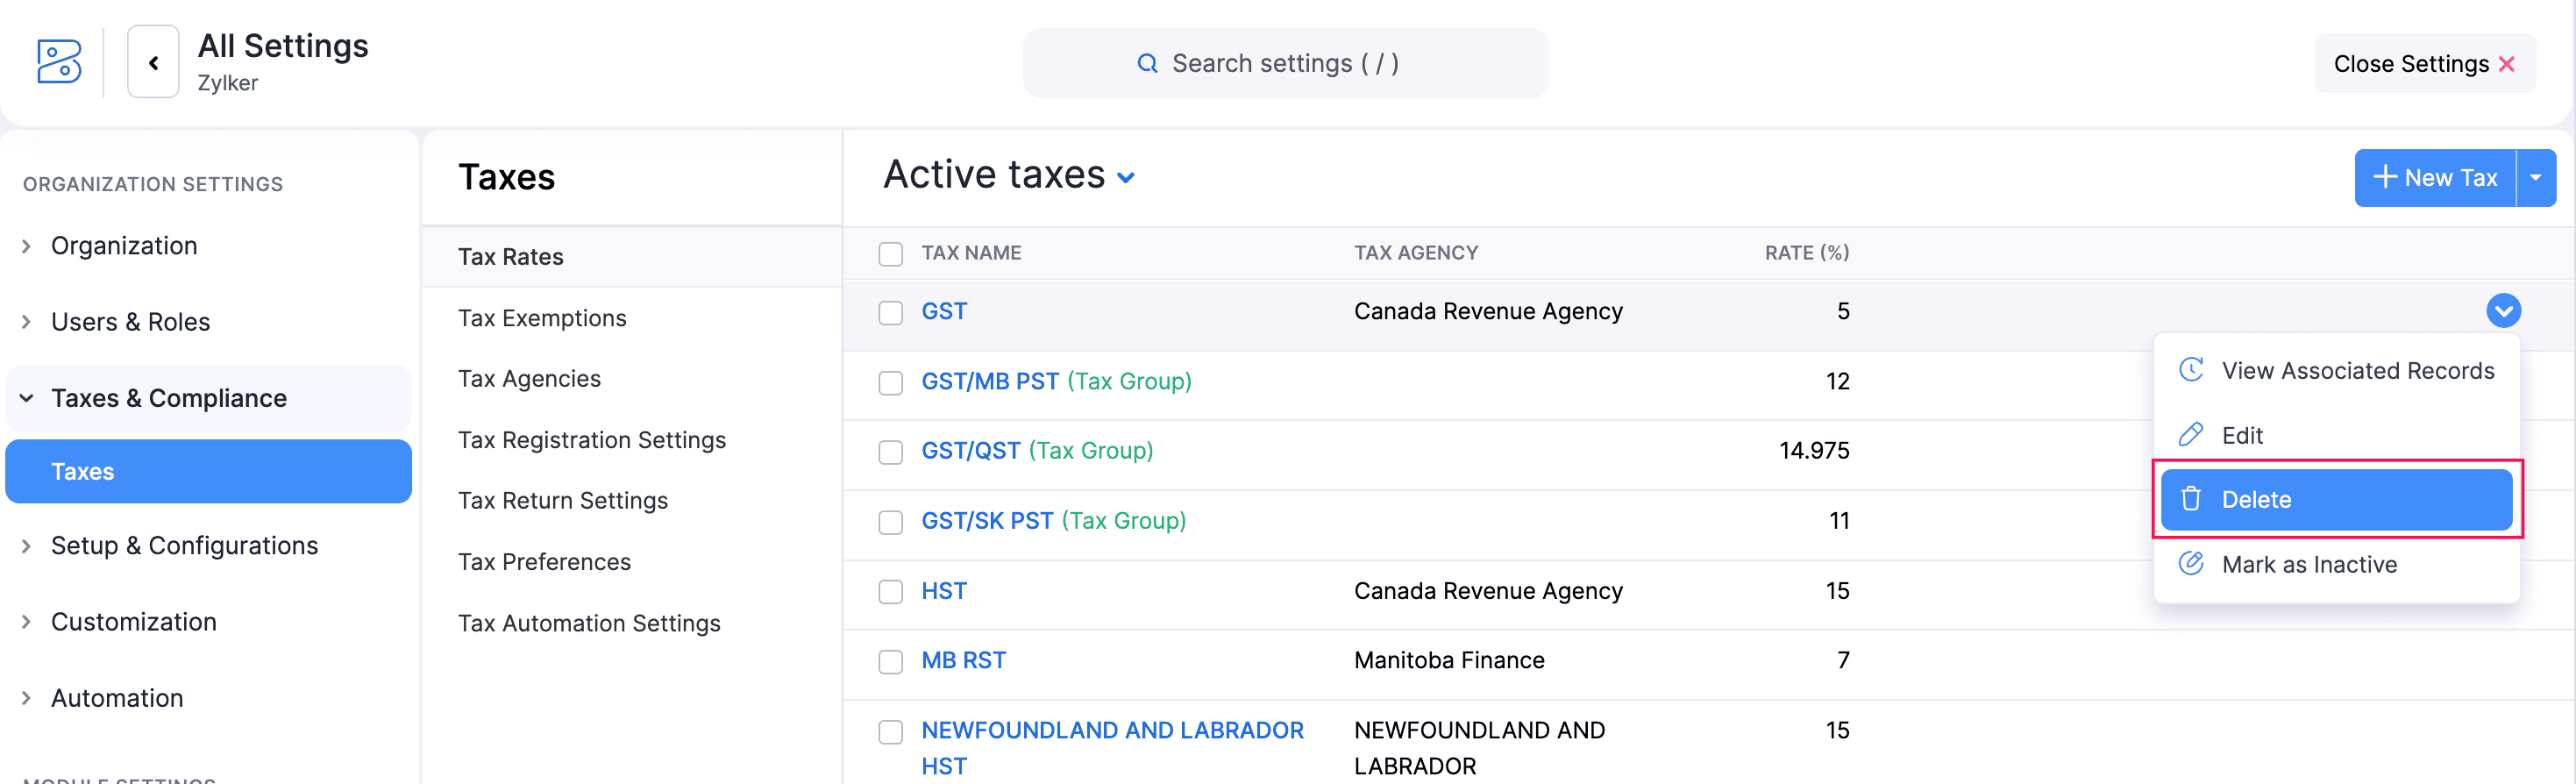
- In the confirmation pop-up, click OK to delete the tax rate.
Note: A tax rate that is associated with existing transactions cannot be deleted. You’ll have to remove or update those transactions before you delete the rate.
Tax Exemptions
Tax exemptions allow you to exclude eligible customers or transactions from sales tax. You can create tax exemptions based on exemption categories such as resale, non-profit organisations, or other tax-exempt statuses supported in your jurisdiction. To create a tax exemption:
- Go to Settings.
- Navigate to Organization Settings.
- Select Taxes under Taxes & Compliance.
- In the Taxes pane, select Tax Exemptions.
- Click + New Tax Exemption in the top right corner.
- In the New Tax Exemption pop-up, fill in the following fields:
- Exemption Reason: Enter the reason for the tax exemption.
- Description: Provide a description of the exemption.
- Type: Choose whether the exemption applies to a Customer or an Item.
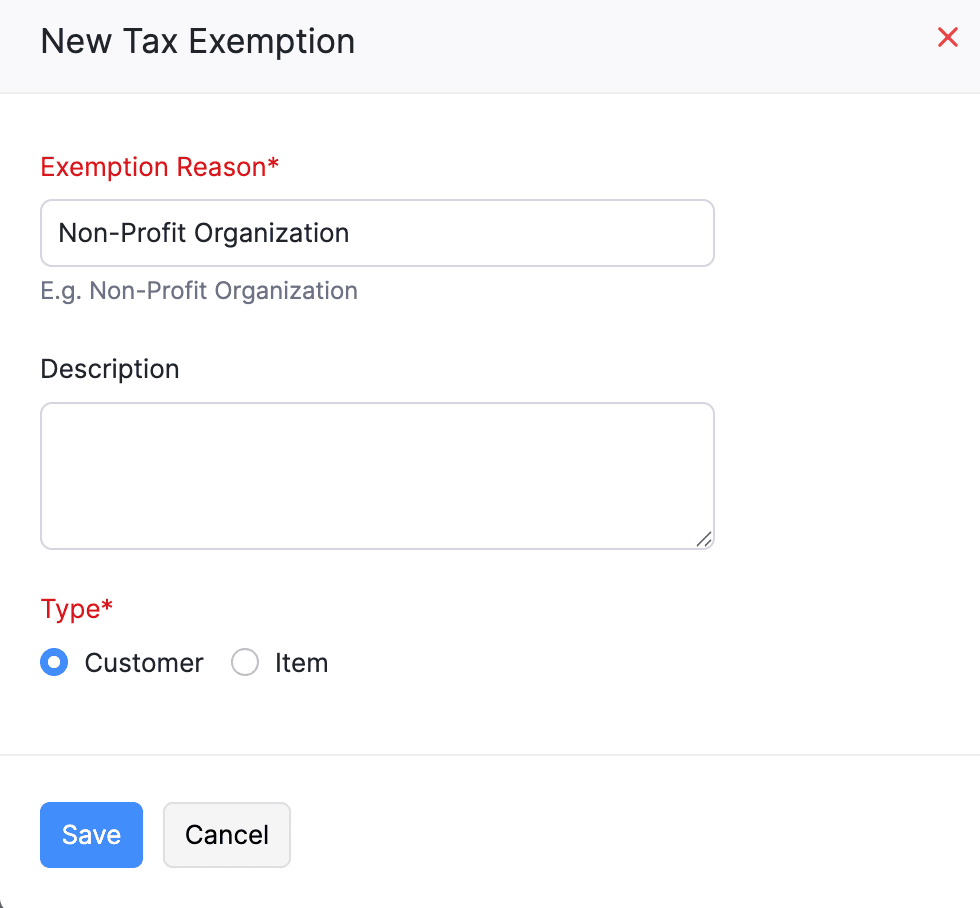
- Click Save.
Now that you’ve created the tax exemption, you can associate it with a customer or apply it to transactions for items.
Tax Agency
A tax agency is the government body responsible for administering and collecting taxes. In Zoho Books, you can create tax agencies and associate them with tax rates to help track tax liabilities and ensure taxes are reported correctly.
To create a tax agency:
- Go to Settings.
- Navigate to Organization Settings.
- Select Taxes under Taxes & Compliance.
- In the Taxes pane, click Tax Agencies.
- Click + New Tax Agency in the top right corner.
- In the New Tax Agency pop-up, enter the following details:
- Tax Agency: Enter the name of the tax agency.
- Registration Number: Add a registration number, if required.
- Description: Add a description, if required.
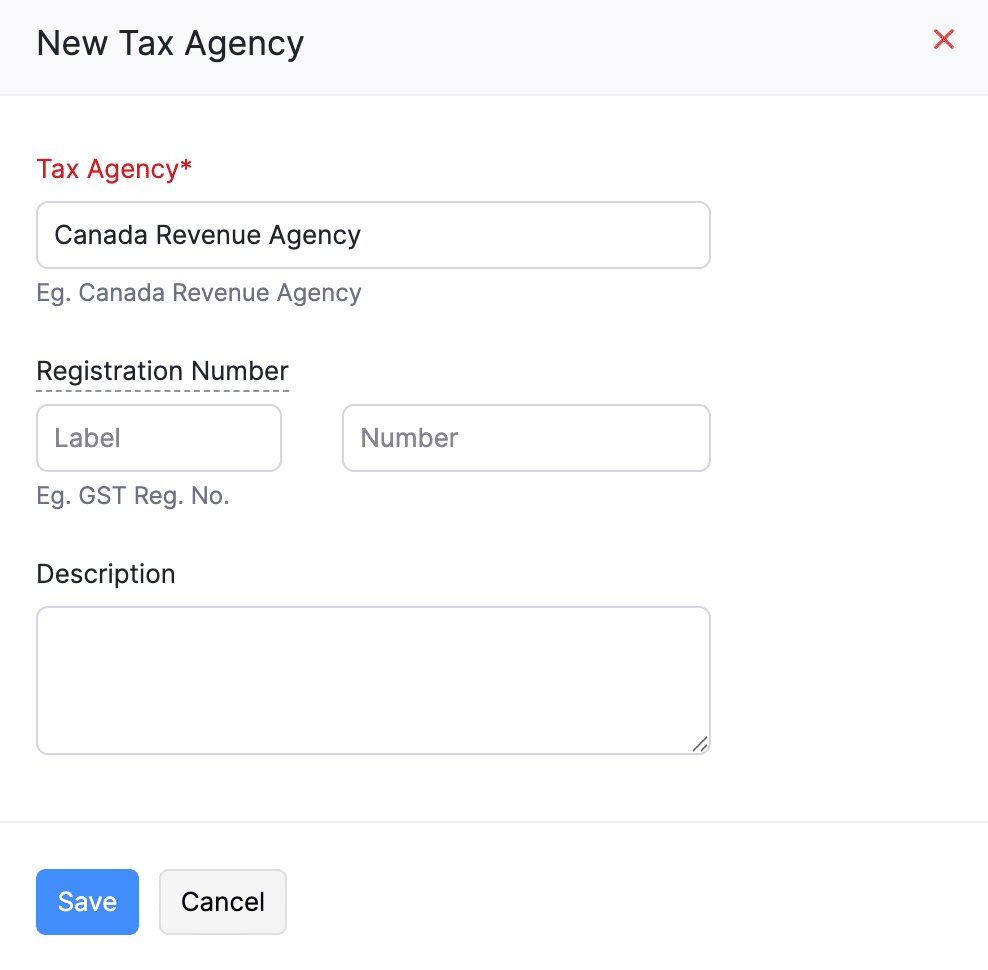
- Click Save.
Once the tax agency is created, you can associate it with tax rates while configuring taxes in Zoho Books.
Tax Override in Purchase Transactions
You can adjust the total tax amount in purchase transactions in Zoho Books by enabling the tax override option. This feature allows you to override the default tax amount to account for specific federal or provincial tax requirements, as tax rates may vary. To enable tax override:
- Go to Settings.
- Navigate to Organization Settings.
- Select Taxes under Taxes & Compliance.
- In the Taxes pane, click Tax Preferences.
- Check the Enable Tax Override for purchase transactions option.
- Click Save.
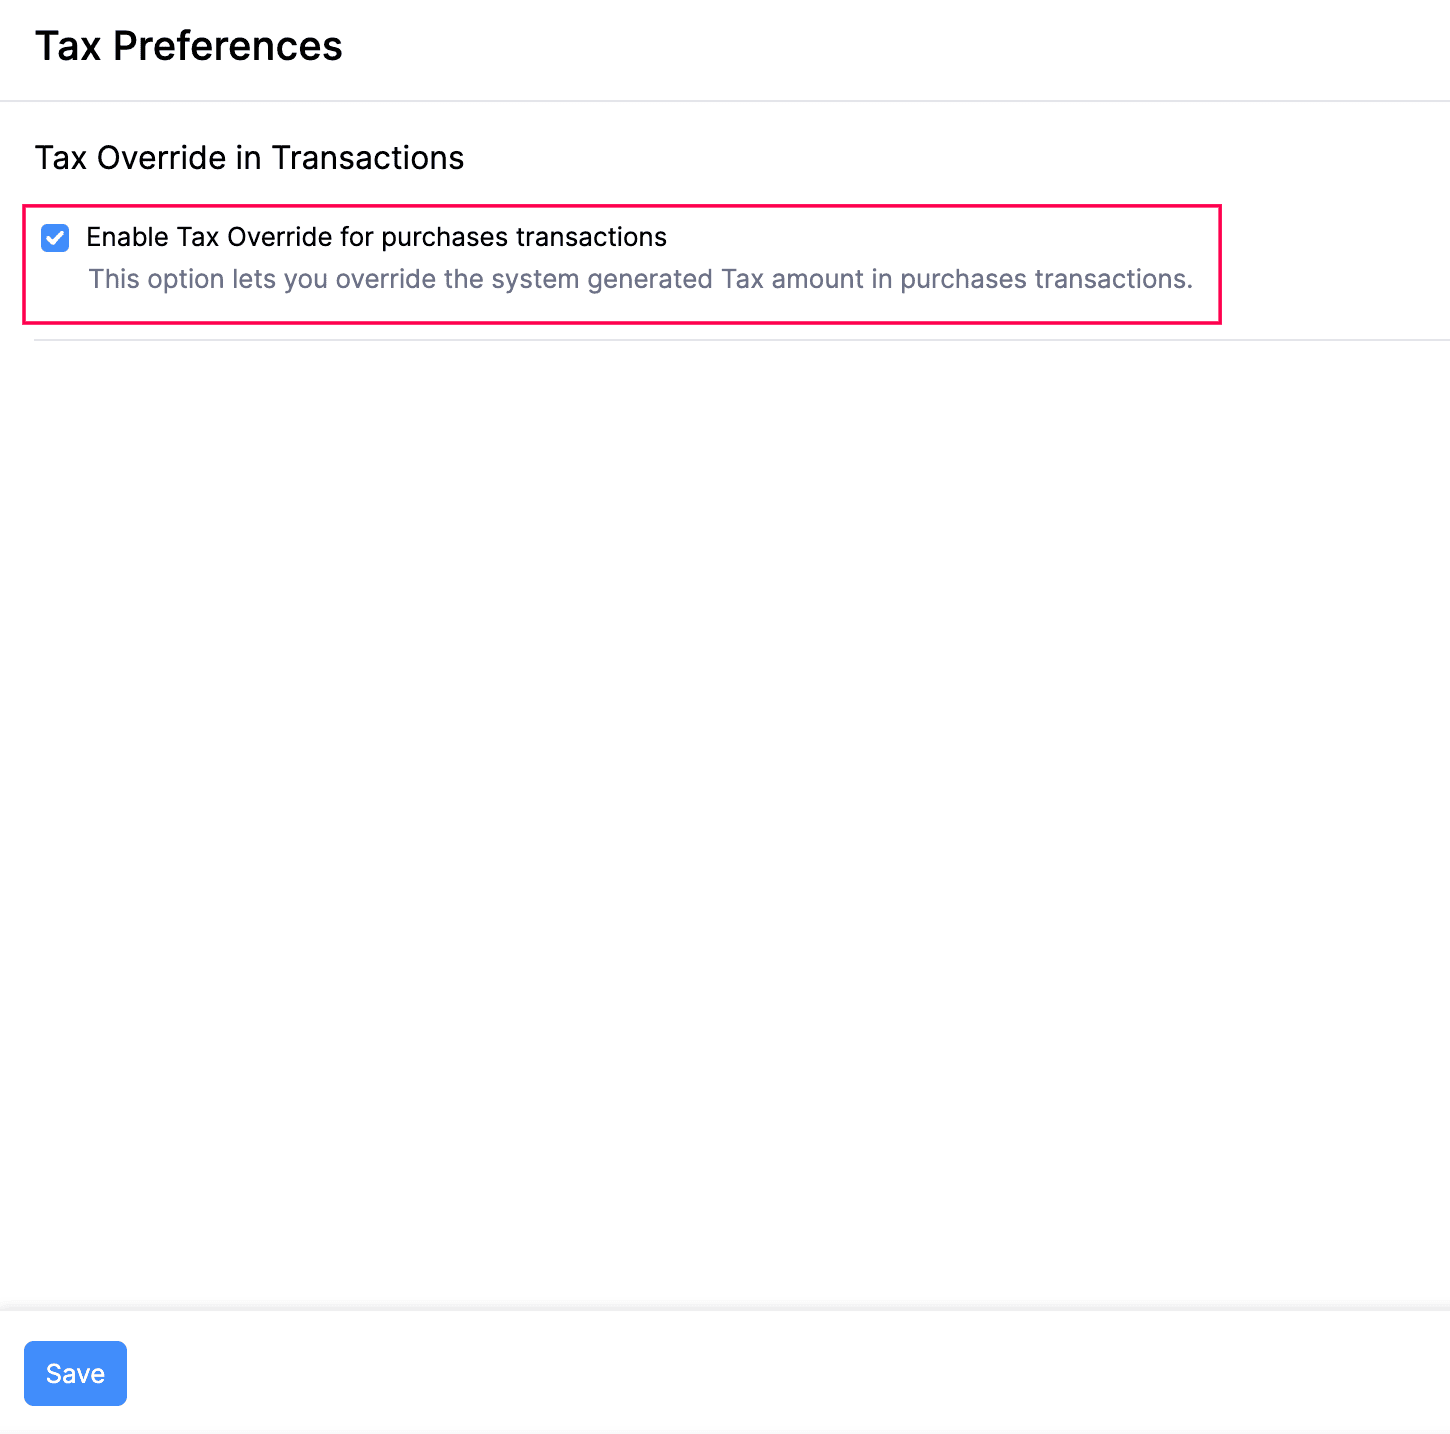
Now that you’ve enabled tax override for purchase transactions, you can modify the tax amount at the transaction level.
Tax Rules
Tax rules in Zoho Books are a set of criteria that determine the tax rates applied to transactions based on the provincial and federal tax rates established by the Government of Canada.
In Zoho Books, tax rules are created automatically based on the Tax Return Settings configured for your organisation. Initially, a default tax rule is created using the GST/HST tax rates applicable across Canada. Once you configure the tax returns for your business, the default tax rule is automatically updated based on the selected tax jurisdictions. The appropriate tax rates are then automatically applied to your transactions according to the default tax rule.
Tax rules assigned to specific customers or vendors are called Contact-Based Tax Rules. When you create a transaction for a customer or vendor with an associated tax rule, the applicable tax rate is automatically applied, regardless of your organisation’s location or the contact’s billing or shipping address.
Tax rules assigned to specific items are called Product-Based Tax Rules. These allow you to define different tax rates for an item based on the province in which the transaction takes place.
Note: This feature is available only for organisations created before 26 April 2026. Organisations created on or after this date can use Sales Tax Automation.
Create Tax Rules
The tax rates in transactions are automatically filled based on the default tax rules. However, some customers, vendors, or items may require different tax treatment. In such cases, you can create additional tax rules and associate them as needed.
To create a tax rule:
- Go to Settings.
- Navigate to Organization Settings.
- Select Taxes under Taxes & Compliance.
- In the Taxes pane, under Advanced Tax Automation, click Tax Rules.
- Click + New Tax Rule.
- In the New Tax Rule page:
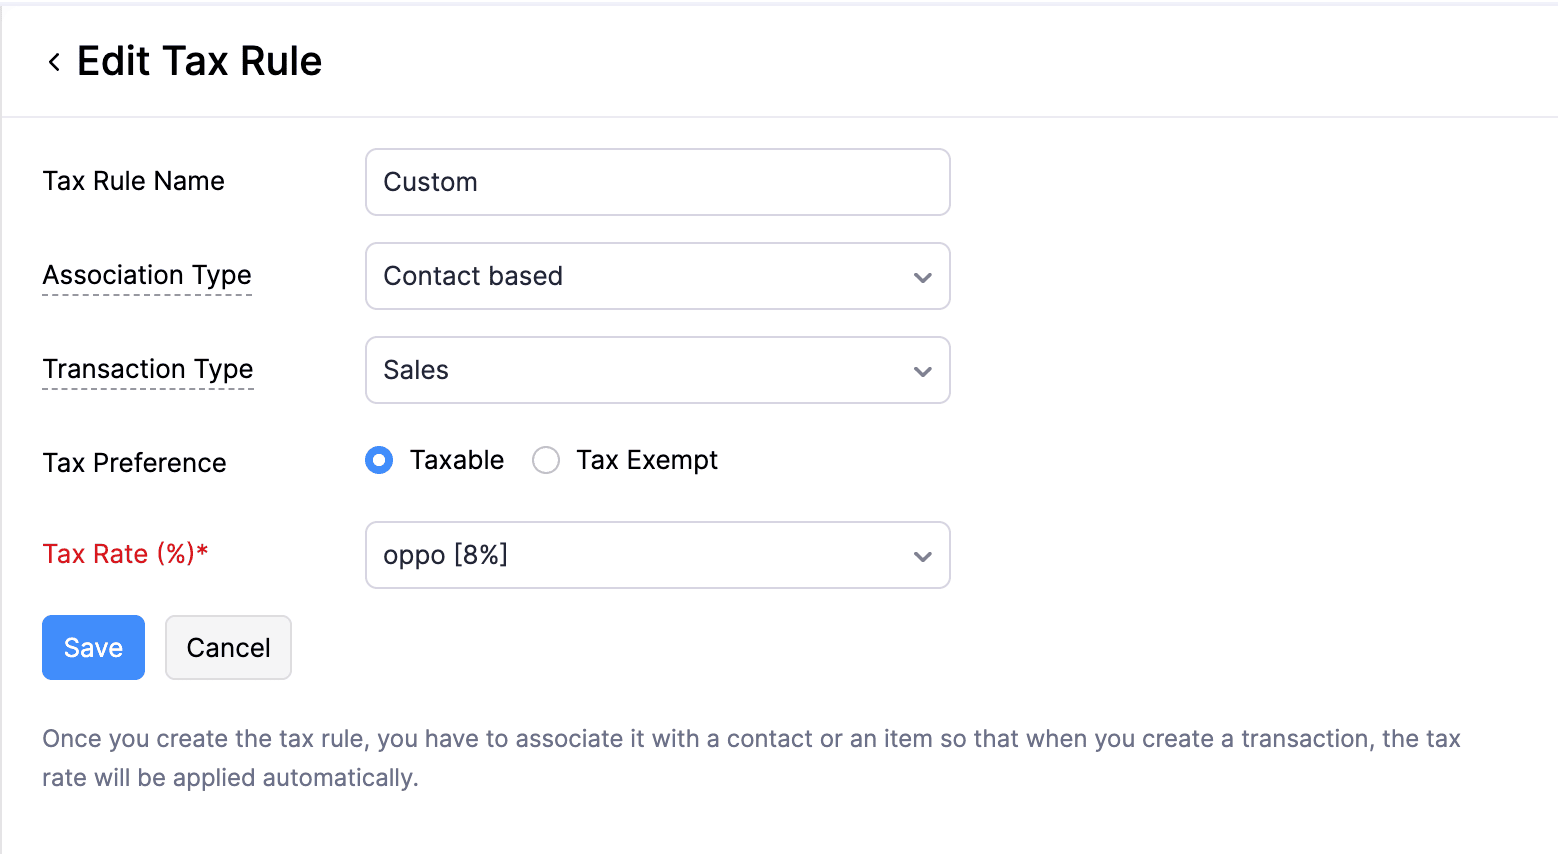
- Enter a Tax Rule Name.
- Select the Association Type:
- Choose Contact-Based to assign the tax rule to customers or vendors.
- Choose Item-Based to assign the tax rule to items.
- If you select Contact-Based:
- Select the Transaction Type as Sales or Purchases.
- If you select Sales, choose your Tax Preference:
- If you select Taxable, select the applicable Tax Rate (%).
- If you select Tax Exempt, select the Exemption Reason and Tax Agency.
- If you select Purchases, select the applicable Tax Rate (%).
- If you select Item-Based:
- Select the Transaction Type as Sales or Purchases.
- Select the Country. You can click + Add New Country to add a new country.
- Select the State. You can click + Add New State to add a new state to the selected country.
- In the Tax Name field, select the tax that you want to associate with the state.
- Click Save.
Associate Tax Rules with Customers and Vendors
To associate an exempt or special tax rule with a customer or vendor:
- Edit or create a customer or vendor.
- Navigate to the Other Details section.
- Select the Tax Rule you want to associate with the customer or vendor.
- Click Save.
Note: Only exempt and manually created tax rules will be displayed in the Tax Rule dropdown.
Associate Tax Rules with Items
To associate a tax rule with an item:
- Edit or create an item.
- Navigate to the Sales Information or Purchase Information sections.
- Click the Sales Tax Rule dropdown, and select the appropriate rule for the item.
- Similarly, click the Purchase Tax Rule dropdown and select the appropriate rule for the item.
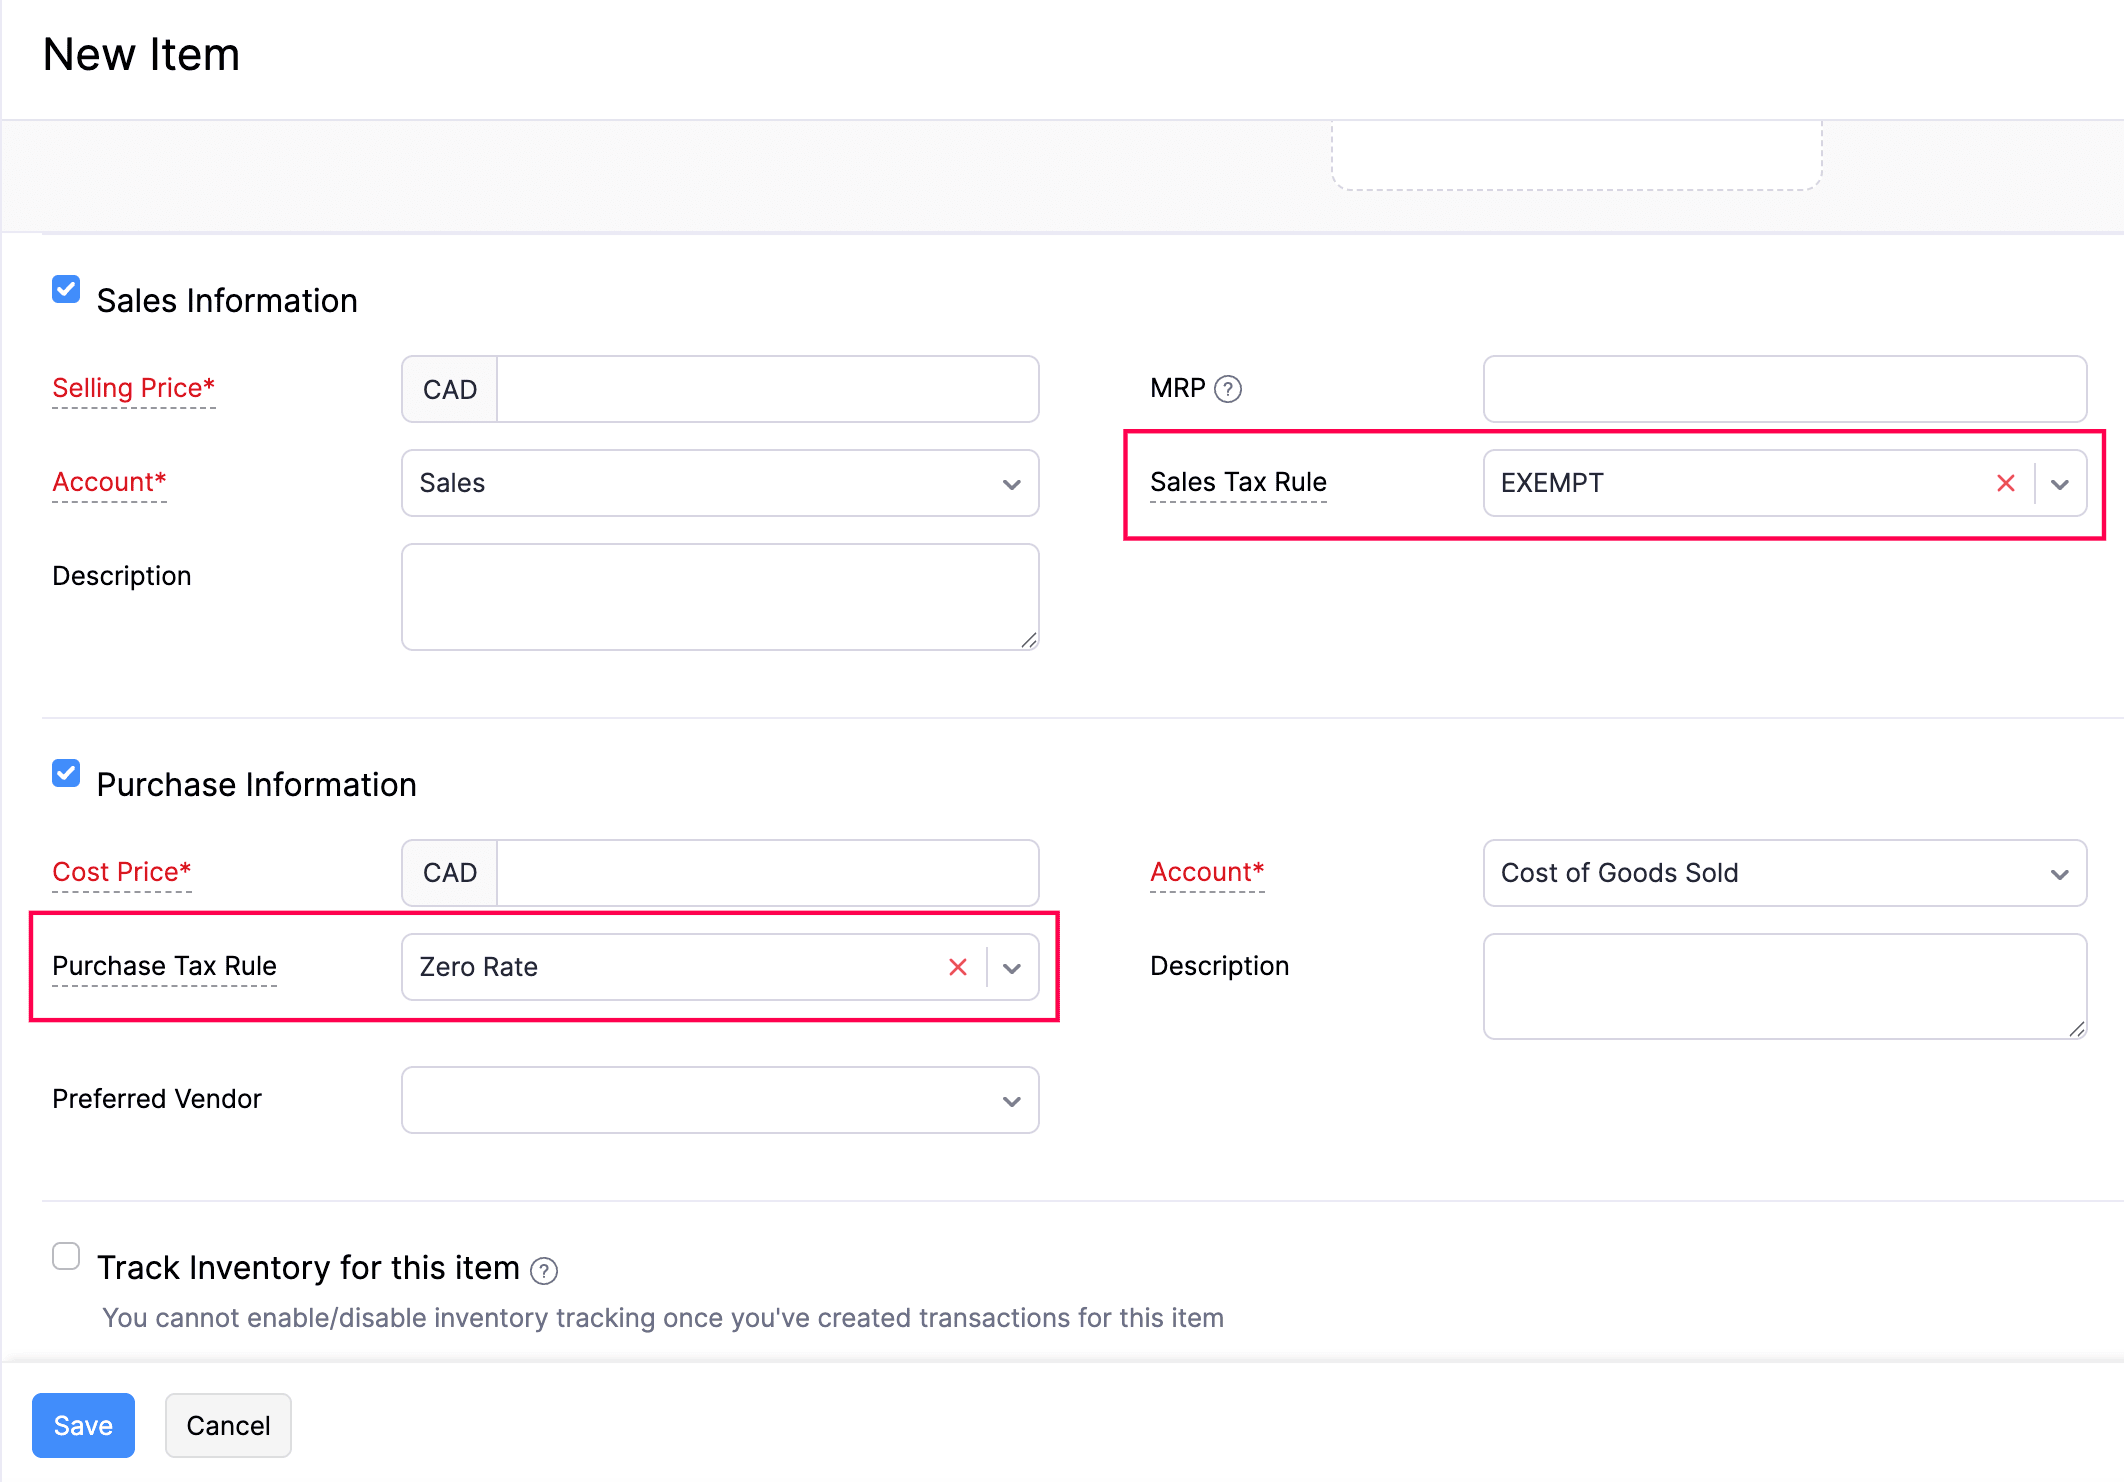
- Enter the other necessary details.
- Click Save.
Note: Only exempt, zero-rate and manually created tax rules will be displayed in the Sales Tax Rule and Purchase Tax Rule dropdowns.
Edit Tax Rules
To edit an existing tax rule:
- Go to Settings.
- Navigate to Organization Settings.
- Select Taxes under Taxes & Compliance.
- In the Taxes pane, under Advanced Tax Automation, click Tax Rules.
- Hover over the tax rule that you want to edit and click the Edit icon.
- Make the necessary changes and click Save.
Note: Default tax rules cannot be edited.
Delete Tax Rules
To delete a tax rule:
- Go to Settings.
- Navigate to Organization Settings.
- Select Taxes under Taxes & Compliance.
- In the Taxes pane, under Advanced Tax Automation, click Tax Rules.
- Hover over the tax rule that you want to delete and click the Delete icon.
- Click OK in the confirmation pop-up.
Note: Default tax rules cannot be deleted.
 Yes
No
Yes
No
Thank you for your feedback!